Files
Neptune CRM Location: Files
The Files page in Neptune allows you to store and organize any business documents that you need to reference or share with customers. These files can be sales brochures, product manuals, safety guides, installation instructions, warranties, or any other documents relevant to your business.
Key Features:
- Upload any file type (PDF, images, documents, etc.)
- Organize files using custom categories
- Attach files to emails sent to customers
- Preview PDFs and images directly in the app
- Chat with PDFs using AI (if enabled)
- Share files across your team
Setting Up File Categories
Admin Access Required
Before uploading files, it’s recommended to set up custom file categories to help organize your documents. This is done on the Custom Fields page, which requires admin access.
To create file categories:
- Navigate to Admin > Custom Fields
- Find the File Categories tab
- Click Add new category to create a new category
- Enter a category name (e.g., “Brochures”, “Manuals”, “Safety Documents”, “Warranties”)
- Continue adding as many categories as you need
- Click Save Categories to save your changes
You can add, edit, or remove categories at any time. Categories help you:
- Organize files logically
- Filter files on the Files page
- Find relevant documents quickly when composing emails
Note: If you remove a category, files that were assigned to that category will not be deleted, but they will lose their category assignment.
See Custom Fields documentation for more details
Uploading Files
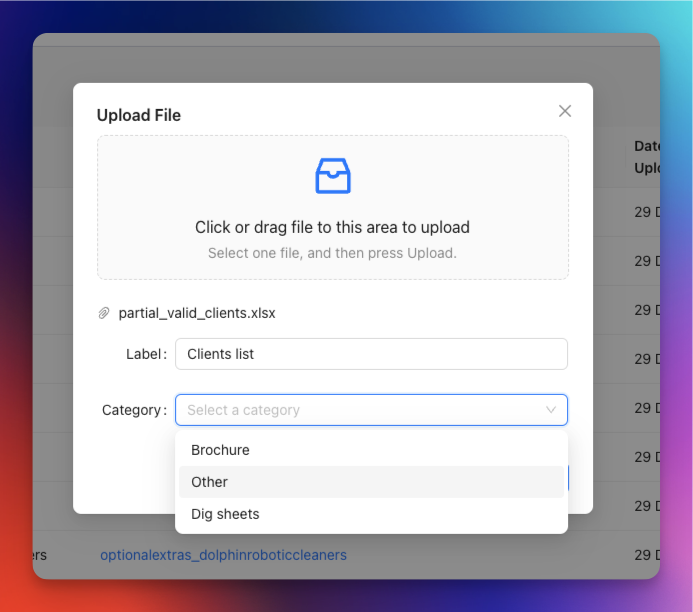
To upload a new file:
- Click the Upload file button (with paperclip icon) on the top right of the Files page
- A modal will appear with a drop zone
- Either drag and drop your file into the drop zone, or click it to browse and select a file
- After selecting your file, you’ll see:
- File name: The actual filename (displayed automatically)
- Label: A friendly name for the file (defaults to the filename, but you can customize it)
- Category: A dropdown to assign the file to a category (if categories have been configured)
- Fill in the label and select a category (optional)
- Click Upload
The modal will close and your file will appear in the table on the Files page.
Tips:
- Use descriptive labels so team members can easily identify the file’s purpose
- Assign appropriate categories to make files easier to find later
- Most file types are supported (PDF, DOCX, XLSX, images, etc.)
Managing Files
Viewing Files
The Files page displays all your uploaded files in a table with the following columns:
- Label: The friendly name you gave the file
- File: The actual filename (click to preview or download)
- Category: The assigned category (if any)
- Uploaded by: The name of the user who uploaded the file
- Uploaded date: When the file was uploaded
- Actions: Menu with available actions (Edit, Delete, Chat with PDF)
Filtering by Category
If you have file categories set up, you’ll see a Filter by category dropdown at the top of the page. Use this to:
- View all files (default)
- Show only files in a specific category
This is particularly useful when you have many files and want to quickly find specific types of documents.
Previewing Files
Click on any filename to:
- PDFs: Preview the PDF in a drawer that opens on the right side of the screen
- Images: Preview images directly in the app
- Other files: Download the file to your computer
The preview drawer allows you to view documents without leaving Neptune.
Editing File Details
To edit a file’s label or category:
- Click the three dots (⋯) in the Actions column for the file you want to edit
- Select Edit from the dropdown menu (pencil icon)
- A modal will appear showing:
- Name: The original filename (cannot be changed)
- Label: The friendly name (editable)
- Category: The assigned category (editable)
- Make your changes
- Click OK to save
Note: You cannot change the actual file itself through editing. To replace a file, you must delete the old one and upload a new one.
Deleting Files
To permanently delete a file:
- Click the three dots (⋯) in the Actions column
- Select Delete from the dropdown menu (trash bin icon)
- Confirm the deletion in the popup
⚠️ Important:
- Deletion is permanent and irreversible
- If any email templates reference this file, they will fail to attach it when used
- Update any email templates that include the deleted file before deleting it
Attaching Files to Emails
One of the primary uses of the Files page is to make documents available for attaching to customer emails. Files stored here can be quickly attached when composing emails throughout Neptune.
Where You Can Attach Files
Files can be attached to emails sent from:
- Customer email tab (when viewing a customer)
- Proposal emails (when sending proposals)
- Contract emails
- Marketing campaigns
- Email templates
How to Attach Files to an Email
When composing an email anywhere in Neptune:
- Complete the standard email fields (Recipient, Subject, Body, etc.)
- Look for the Brochures field (this is the field for attaching files from the Files page)
- Click the Brochures dropdown
- If you have file categories set up, files will be grouped by category
- Select one or more files to attach
- Selected files will appear as tags in the field
- When you send the email, these files will be attached automatically
How it works:
- Files are referenced by their label in the dropdown
- Multiple files can be attached to a single email
- Files are organized by category in the dropdown (if categories exist)
- The system automatically generates download URLs for attached files
- Recipients receive the files as standard email attachments
Attaching Files vs. Uploads vs. Documents
When composing emails, you may see different attachment options:
-
Brochures (Files from the Files page)
- Shared across your organization
- Pre-organized by category
- Best for: Marketing materials, product information, standard documents
-
Uploads (Customer-specific uploads)
- Files uploaded directly to a specific customer record
- Only available when emailing that customer
- Best for: Photos, site-specific documents, customer-provided files
-
Documents (Proposals, contracts, variations)
- System-generated documents like proposals and contracts
- Include secure access links
- Best for: Formal business documents that need to be tracked
Using Files in Email Templates
Files can be pre-attached to email templates, making it easy to send consistent communications with the right documents automatically attached.
To include files in an email template:
- Navigate to Templates > Email
- Create a new template or edit an existing one
- In the template form, find the Brochures field
- Select the files you want to automatically attach when this template is used
- Save the template
When using a template:
- When you select the template in an email compose window, the associated files are automatically selected in the Brochures field
- You can add or remove files before sending if needed
- The template saves you time by pre-selecting commonly used files
Example use cases:
- “Initial Contact” template might include company brochure and service guide
- “Product Information” template might include relevant product specifications
- “Proposal Follow-up” template might include FAQ document and warranty information
PDF Chat Feature
Premium Feature (requires upgrade)
If you have the PDF Chat feature enabled, you can interact with PDF files using AI:
To chat with a PDF:
- Find the PDF file in your Files table
- Click the three dots (⋯) in the Actions column
- Select Chat with PDF (chat bubble icon)
- A drawer will open on the right side of the screen
- Ask questions about the PDF content
- The AI will analyze the document and provide answers
Use cases:
- Quickly find information in long technical documents
- Extract specific details from manuals
- Summarize document content
- Get answers without reading through entire documents
Best Practices
Organizing Your Files
- Use descriptive labels: Make labels clear and specific (e.g., “Pool Installation Guide 2024” instead of “guide.pdf”)
- Leverage categories: Set up logical categories that match your business workflow
- Keep it current: Regularly review and remove outdated files
- Version control: Include dates or version numbers in labels for files that update regularly
File Naming Conventions
- Use consistent naming patterns across your team
- Include key information in the label (product name, document type, version)
- Avoid generic names like “Document 1” or “File”
Storage Considerations
- Files are stored securely in the cloud
- There’s no hard limit on the number of files, but keep your library organized
- Very large files may take longer to upload and attach to emails
- Consider file size when attaching multiple files to emails
Team Collaboration
- Files uploaded by one team member are available to everyone in your organization
- Use categories to help team members find the right files quickly
- Communicate with your team when adding or removing important files
- Admin users can manage file categories for the whole organization
Troubleshooting
File Won’t Upload
Check:
- File size - very large files may time out
- File type - while most types are supported, some may be restricted
- Internet connection - ensure you have a stable connection
- Browser - try refreshing the page or using a different browser
File Not Appearing in Email Dropdown
Check:
- Has the file finished uploading? Check the Files page to confirm it’s there
- Try refreshing the email compose window
- Ensure the file wasn’t deleted by another team member
Email Template Not Including File
Check:
- Was the file deleted after the template was created?
- Edit the template and verify the file is still selected in the Brochures field
- Update the template to select the correct replacement file
Categories Not Showing
Check:
- Have file categories been set up? (Admin > Custom Fields)
- Try refreshing the page
- Only Admin users can create categories - contact your administrator
Related Documentation
- Custom Fields - Set up file categories and other custom fields
- Email templates - Create reusable email templates with file attachments
- Marketing - Use files in marketing campaigns
- Customers - Manage customer-specific uploads
Questions? Contact support at support@neptunecrm.com